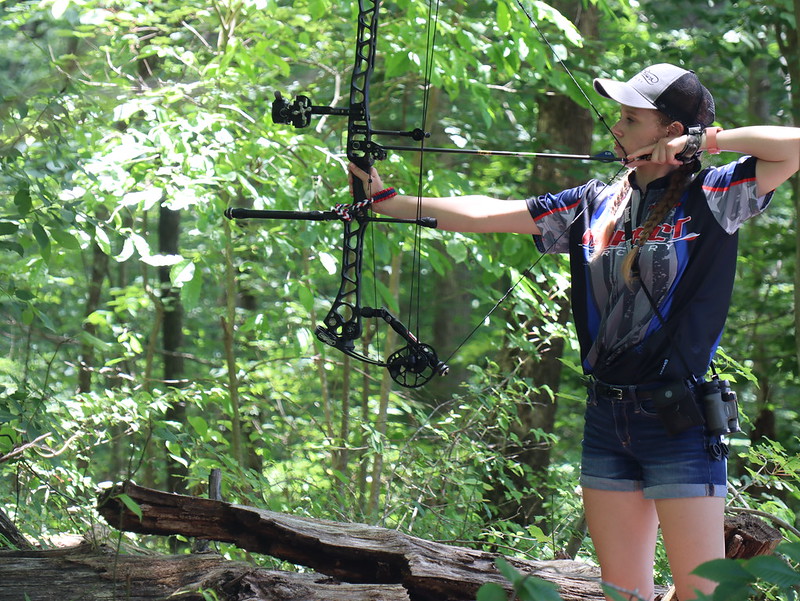
Is my child too young for archery?
Archery is a great introductory sport for anyone of any age or skill. Many athletes shoot archery without having played other sports or honed any athletic skills. That makes it appropriate for any age. Archers must only focus and aim steadily. In addition, archery tournaments have age divisions for all kids who enjoy competing, so they can take their archery passions from the range to the tournament stage whenever they like.
What equipment do they need?
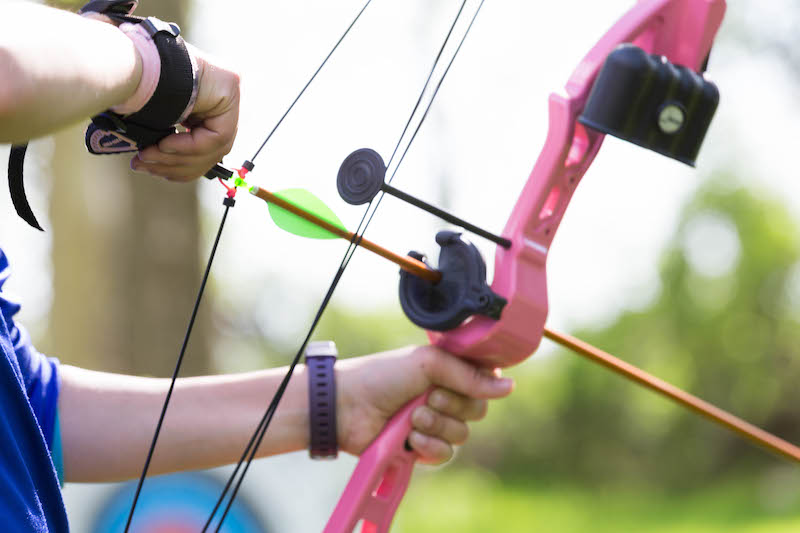
Your child’s equipment needs depend on the discipline they choose. Compound-bow archers also need a mechanical release aid. Recurve archers need a riser, two recurve limbs, and a finger tab. All archers need arrows, a bowstring, a quiver, an armguard, and a bow case. You can increase their accuracy by adding a sight and stabilizer. Carbon arrows are the most durable option, and they’re great for beginners. The arrow’s spine and length will be matched to your child’s draw weight and draw length; and will also depend on whether they shoot field, 3D, indoor or target archery.
An archery shop technician will measure your child’s draw length and draw weight to match them with a bow. The draw length measures how far they pull the bowstring when drawing a bow, and the draw weight measures how many pounds they can comfortably pull. To start, they can rent a bow from the shop and test it on the range. Once your child finds the right bow, think about buying it for them. Beginning archers build muscles while practicing, and eventually they’ll need a heavier draw weight. Therefore, start them with a less expensive bow and upgrade when it’s clear they’re ready for a more permanent bow.
Which classes and programs are available?

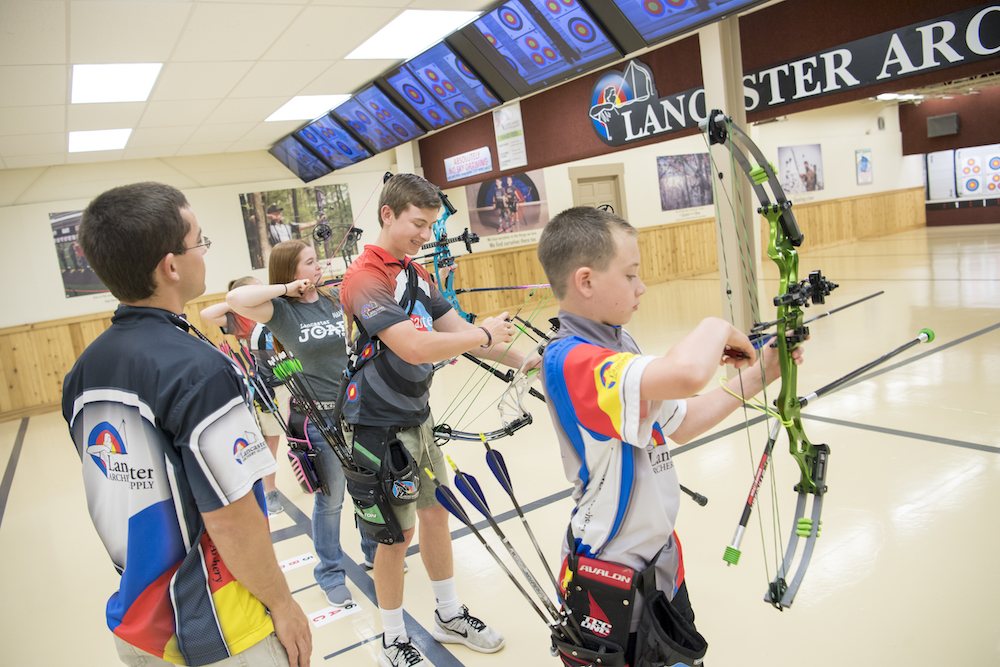
Ranges host leagues, youth programs, and introductory classes. If your child is young or particularly shy, offer encouragement by taking the introductory lesson with them. Then, transition to becoming a sidelines spectator with other parents and friends. Watch the lessons until you know basic form and safety procedures, and offer reminders as your child practices at home. Meanwhile, talk to other parents and ask them about their experiences. They might connect you with another program or offer firsthand advice.
You’ll also find plenty of national options like Scholastic 3D Archery, the National Archery in the Schools Program, and the Junior Olympic Archery Development program. Those programs present opportunities for kids to connect with other archers their age, and to learn from older, more experienced archers. Many tournaments offer scholarships to promising youngsters. The Vegas Shoot, for example, awards scholarships to the top three archers in each Junior division, as well as the Cub category, for archers 11 and younger. If the recipients are too young to apply the scholarship toward higher education, the winnings remain in their scholarship fund until they’re ready.
No matter your kid’s age, you’ll find many ways for them to try archery. They can shoot for fun, competition, and even a spot on the Olympic stage. Archery’s only limitations are those that archers set for themselves. Whatever your child’s path, their first steps are toward the range.
The post How to Start Your Child in Archery appeared first on Archery 360.
]]>When it comes to archery equipment, you have endless options that fit every budget, skill level, purpose and person. To decide which options to choose, start with a visit to your local archery store. The staff will help you pick a bow that fits your needs. After that, it’s time to add your accessories.
Arrows
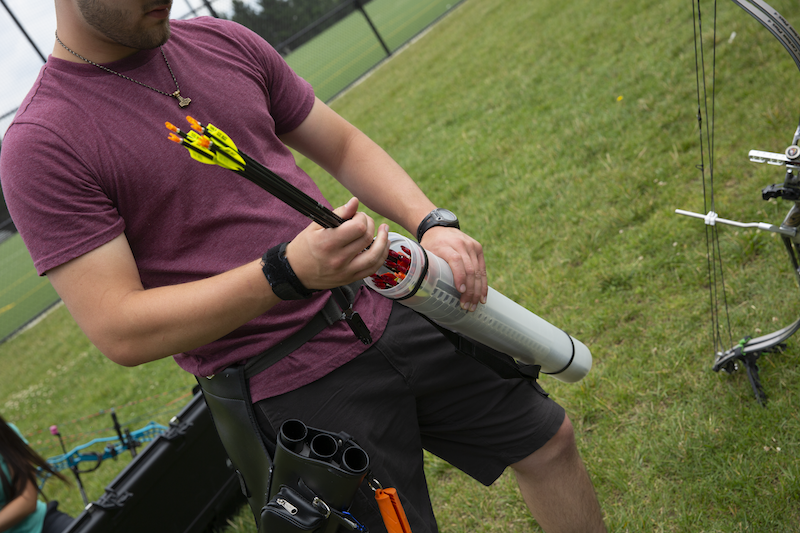
Once you’ve selected a bow, you’ll need the correct arrows. Choose arrows that match your bow and your chosen archery discipline. You can select from carbon, aluminum and wood arrow shafts with your choice of fletching.
Fletchings stabilize the arrow in flight, and come in two basic materials: feathers and vanes.
Plastic fletchings are called vanes. Vanes are usually preferred for compound bows and modern recurve bows with an elevated arrow rest. Vanes are popular because they’re durable and waterproof.
Feathers are a great choice when you need maximum forgiveness and arrow stability. Traditional and competitive archers often choose feathers when shooting at indoor tournaments.
You’ll make lots of decisions when selecting arrows, but count on the expertise at your local archery shop to make the process easy. Just tell the technician your budget, bow specifications and the type of shooting you enjoy (field, 3-D, indoor, target archery).
Quiver
A quiver’s job is to hold your arrows while you’re shooting. You can choose a back quiver and channel your inner Robin Hood, or go for the waist quiver for your belt or a bow quiver that snaps onto your bow.
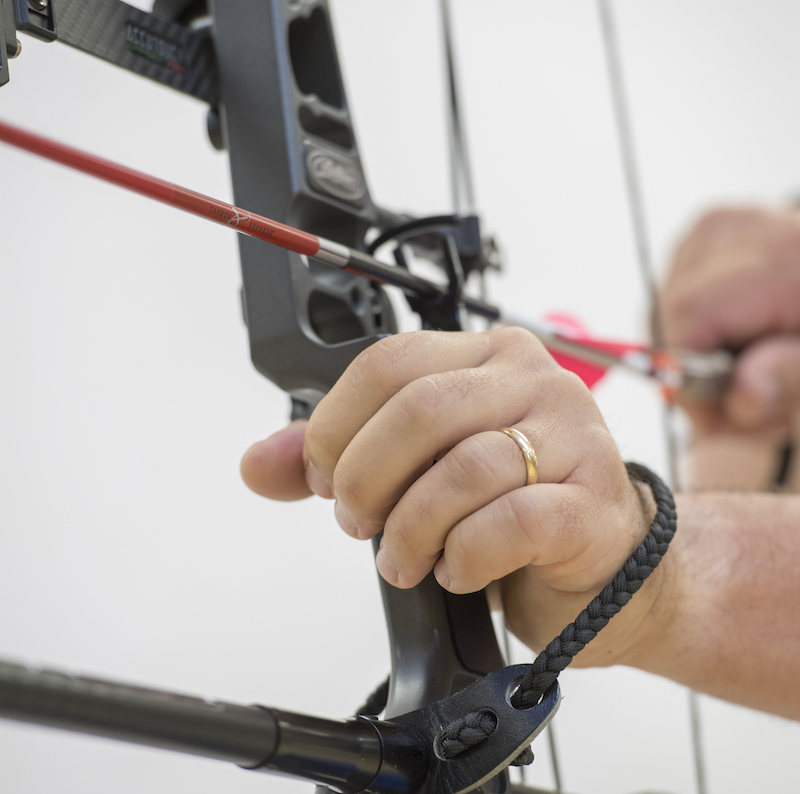
Release and Finger Tab
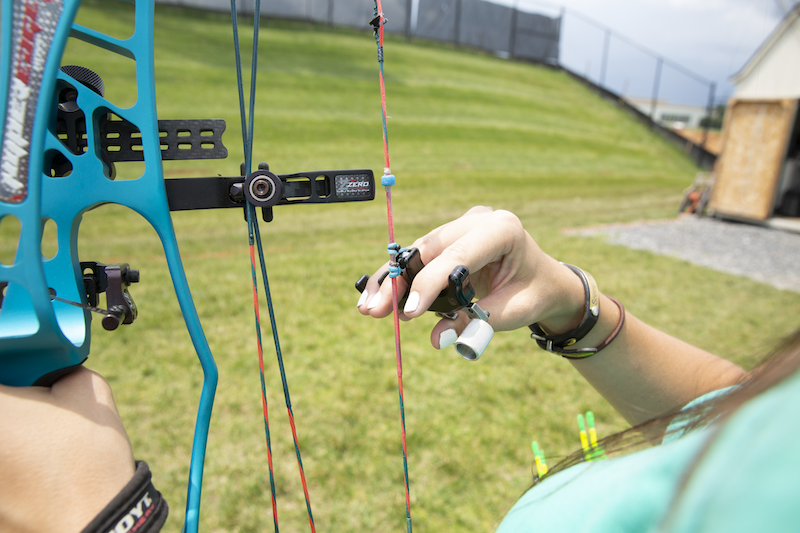
Release aids and finger tabs protect your fingers and help you release the bowstring. A mechanical release aid uses a trigger system. The release attaches to the bowstring with jaws or a clip. The bowstring on most compound bows has a D-loop, which is a short cord tied into a loop just below where the arrow’s nock grips the string. The archer’s release aid clips onto the D-loop.
Once the release is attached to the D-loop, the archer draws the bow, aims and squeezes the release aid’s trigger with the thumb or index finger. With the proper amount of pressure on the trigger, the release aid lets go of the string, and the arrow flies to the target. The release aid’s trigger mechanism can help deliver astonishing accuracy.
Mechanical releases come in two basic styles: wrist-strap and handheld. Wrist-strap releases attach to your wrist with a buckle or Velcro strap. Most beginning compound archers start with this release style because it’s affordable and easy to use.
With a finger release, archers use their index, middle and ring finger to grip the bowstring. The archer grips the bowstring at the first joint of these three fingers. Next, they draw the bow, aim and then relax their fingers to let the bowstring slip away.
Recurve and longbow archers use a glove or finger tab to shoot their bows comfortably. Gloves and finger tabs are made of leather, and come in several sizes.
A finger tab fits between your fingers and the bowstring. The tab should cover your three fingers but not hang over your fingertips. For a custom fit, trim the finger tab with scissors.
A shooting glove looks like a leather work glove, but it only covers the tips of your three shooting fingers. The fingertip sections carry leather strips, and the glove itself secures around your wrist. Gloves come in many sizes, and you can test-shoot with them at an archery store.
Arm Guard

When you release a bowstring, it passes by your forearm – and this can really sting. Use an armguard to protect your forearm and keep your shooting pain-free.
Bow Case
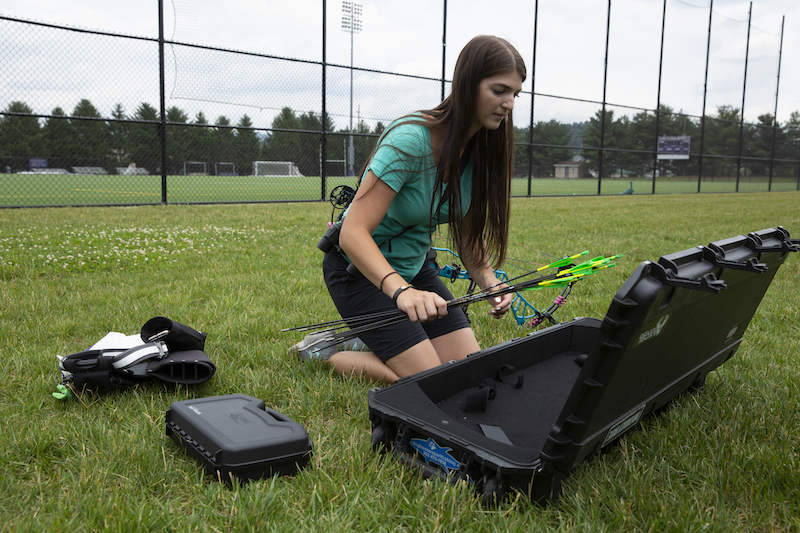
Bow cases protect your bow when traveling between home and the range. Unprotected bows can be dropped onto cement or knocked against a car, door or wall while you move your equipment.
Hard cases offer bows the most protection. Most are rated for airline travel, which means you can take your bow on vacation or to a tournament. Some models have wheels for easy rolling and maneuvering and can be locked for safekeeping.
Soft cases, however, meet most archers’ needs. They’re lighter than hard cases, protect your bow from nicks and dings, and keep your gear together and organized. Many soft cases are rated for airline travel, while others are better suited for road trips.
Tools and Other Accessories
Other items you might need:
- A bow stringer for stringing your recurve or longbow
- Allen wrenches for adjusting your sight or maintaining your bow
- A bow stand to rest your bow on when you’re not shooting it
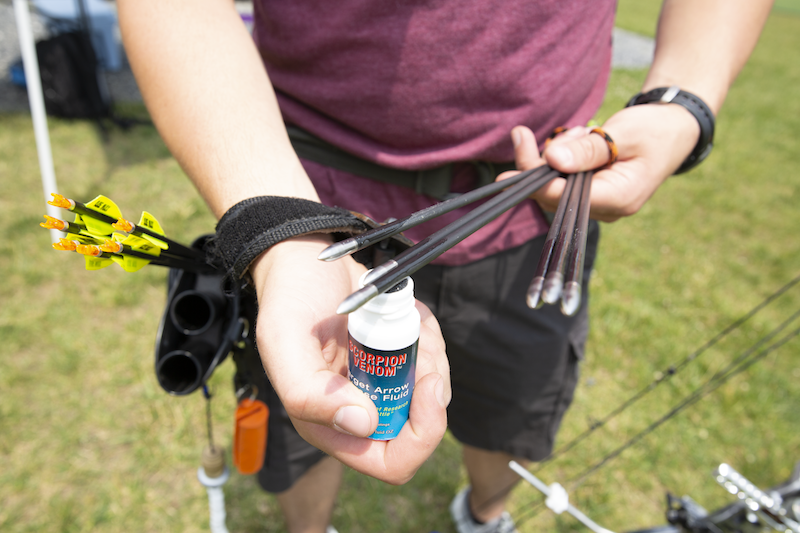
- Arrow lube and arrow puller to easily remove your arrows from the target
- String wax to keep your bowstring looking like new
With these essentials, you’ll have everything you need to enjoy archery at home or the local archery range. You can pick them up at a nearby archery shop. To find an archery shop near you click, here.
The post Everything but the Bow: What You Need to Get Started in Archery appeared first on Archery 360.
]]>You’ll find many brands and models of arrow rests at nearby archery shops, and they’re divided into three categories: launcher, drop-away, or full-capture. To find the right fit for your bow, you must know their differences, how they work, and how they’ll affect your shooting style.
Launcher
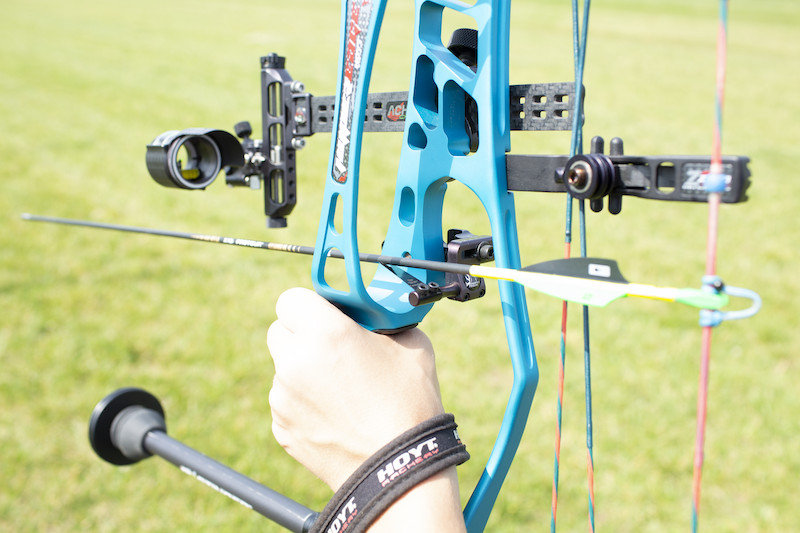
Launcher rests entered the market long before drop-away or full-capture rests, and remain time-tested workhorses. They’re simple, reliable and affordable, and they deliver downrange accuracy with minor tuning.
A prong or blade supports the arrow throughout the draw cycle and shot. Their simple design minimizes the launcher’s contact with vanes or fletching, but because nothing on the rest holds the arrow, it can fall off if you tilt the bow at any time. Launcher rests are great for shooting indoors, but if you bowhunt a lot or shoot at odd angles on a range, you might be better suited to use a different type of rest.
Full-Capture
Much like launcher models, full-capture rests support the arrow at all times, but they have no moving parts and provide nearly full containment at all times. No matter how much you tilt your bow, the arrow stays in place. That feature makes full-capture rests ideal for archers who like shooting 3D target at awkward angles.
Just remember that the more contact points between the rest and arrow shaft, the better your setup must be tuned. If one side affects the shaft more than the other, the arrow won’t fly straight. But don’t let that discourage you. Visit an archery shop and set up a paper-tuning session. The archery pro will get you ready to shoot.
Drop Away
Drop-away arrow rests are more complex to tune than other options, but they deliver superior accuracy once they’re properly set up. That’s because the rest falls away from the shaft and vanes or fletching before the arrow clears the riser. That means it touches nothing once you release your shot.
Manufacturers make two types of drop-away rests: limb-driven and cable-driven. They’re distinguished by their connecting point with the bow. Limb-driven rests connect to the bow’s lower limb, while cable-driven rests connect to the cable.
Most archers don’t set up a drop-away rest on their own. After all, archery shops have a bow press and expert staff who know how to serve, time and tune precision equipment. Whether you shoot indoor, 3D targets or a little of everything, you can maximize your setup’s accuracy with a drop-away rest.
Conclusion
The archery market offers myriad arrow rests, which can seem overwhelming. But if you understand the advantages of each type, and align those benefits with your goals, you’ll quickly narrow your focus and find the best rest for you.
The post Which Arrow Rest is Best for You? appeared first on Archery 360.
]]>Backyard archery ranges make practicing convenient, but be sure your setup is safe before shooting your first arrow. Let’s review what to include when planning a backyard range.
Local Laws
Start by checking your town or county’s website for archery-related ordinances. You can also call the police department’s information line or visit an archery shop to learn if backyard practice is legal.
It’s also a good idea to tell neighbors you plan to practice archery in your yard. Explaining your setup can calm concerns and prevent conflicts.
Backstops

Carefully plan where you’ll place your target. Don’t shoot toward roads, houses or areas where people pass by or hang out. In addition, build a physical backstop to catch stray shots. The backstop should be larger than the target and capable of stopping arrows. This could be an old carpet hung behind your target to catch shots. If possible, also leave about 25 yards of safe area behind the target and backstop.
Range Layout and Targets
As with bows and arrows, several varieties of targets will suit your needs, budget and archery type. Three basic types are 3D targets, small portables, and large target bales. Every target has pros and cons.
You can store small portable targets indoors and carry them outside when practicing. Place these targets on the ground so you’ll shoot at downward angles, which ensures misses won’t travel far.
Large target bales are expensive, but last longer than smaller targets because you can spread out where you shoot the bale. It’s also more difficult to miss large bales, which makes them ideal for backyard use and long-distance shooting.
Also consider 3D targets, which are fun to shoot and great practice for bowhunting and 3D competitions. Their downside is that they’re usually smaller and easier to miss.
As with other archery gear, buy targets and shooting bales from experts at an archery shop. They’ll help you choose the best target for you.
Safety Rules
Backyard ranges require safety rules at all times. If others are shooting with you, tell everyone when the range is clear and when they can resume shooting. Make sure everyone knows to stay behind the shooting line when anyone is practicing. Also, keep your pets leashed or indoors.
Having a convenient place to practice means you’ll shoot more, improve quickly, and have more fun. To get started on your backyard range, visit an archery shop for advice and a target. You can find a nearby shop here.
The post Is it Safe to Shoot in My Yard? appeared first on Archery 360.
]]>Accurate archery requires consistency in every part of your shot, whether it’s your grip, your anchor, or how far you pull the bowstring back. That’s especially true when shooting recurve bows.
Even a fraction of an inch difference in a recurve’s draw length changes the arrow’s impact point. That’s why many Olympians use a clicker.
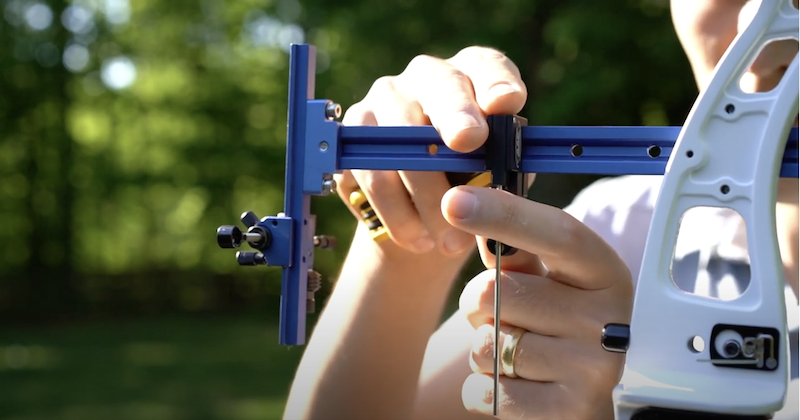
Clicker Options
As the name implies this bow accessory makes an audible click, which has a dual purpose. It helps archers keep their draw length consistent, and it helps them mentally execute a consistent release by triggering their shot.
Manufacturers make myriad types of clickers, but the most common mounts on a bow’s riser and includes an arm that extends toward the arrow shelf. The arrow sits under the clicker arm. When the arrow tip pulls past it, the arm hits the riser to make the click.
Another clicker mounts to the bowsight. It works just like the riser-mounted clicker, but provides more adjustment range for different arrow lengths. If you shoot a longer arrow, or you’re young and still growing, a bowsight-mounted clicker is an excellent option.
A third type of clicker is limb-mounted, and it’s most commonly used by traditional archers. These clickers mount to the limb with double-sided tape, and connect to the bowstring with a cord. As the cord pulls tight, a tab on the clicker flexes and clicks.
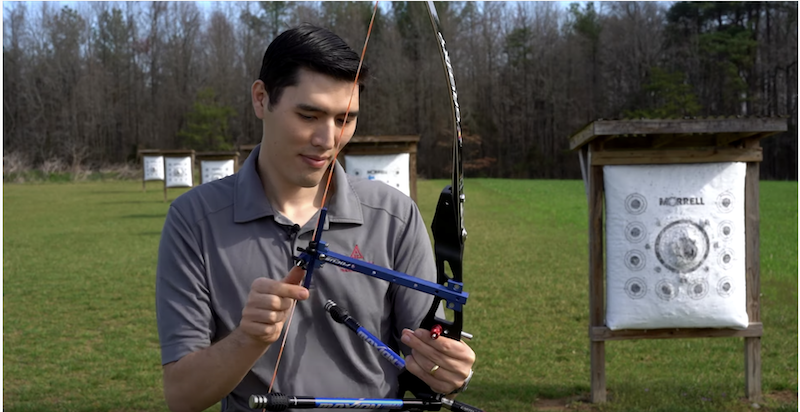
Clicker Set Up
Adjusting your clicker is much like adjusting your sight. The initial setting gets you close, and then you fine-tune it. With help from a friend or coach, pull your bow to full draw and note the arrow point’s distance to the clicker. Let down and move the clicker until it’s close to the arrow point’s position at full draw.
Now put your arrow under the clicker and come to full draw again. When you reach your anchor point, you should have about a ¼-inch remaining in the draw to make the clicker go off. Your goal is for the clicker go off at the same time on each shot with a slight movement of your back muscles.
Clickers are a fantastic tool, but if you can’t reach your draw length consistently you’ll endure lots of frustration. Consistent draw lengths require precision in your alignment, bow arm and anchor point. A coach can help you with those aspects of form, and help you decide when you’re ready to use a clicker. To find a coach, click here.
The post A Beginner’s Guide to Recurve Clickers appeared first on Archery 360.
]]>My dad had bought me the rifle for my 15th birthday and gave me a couple boxes of 170-grain Remington Core-Lokt cartridges, along with a couple of boxes of Winchester Silvertip 170-grain cartridges. “Keep those Silvertips for when we go bear hunting up in the Catskills,” he told me. “They penetrate better than normal bullets.”
He was correct in his evaluation of the ammo of that time. The Winchester Silvertips were considered a premium bullet, with an aluminum-alloy tip that helped control expansion, which resulted in deeper penetration. Now, that’s not to say that the Silvertip was a poor choice for the deer hunter, but it might have been a bit more than what was needed.
That was 30-something years ago. Today there is a mind-boggling number of cartridges and bullets to choose from when it comes to deer hunting. So, let’s talk about what makes a good deer bullet, examining a number of different hunting scenarios, so you can best choose the bullet which will suit your hunting needs.
The whitetail deer, along with the feral hog, is hunted with a wide and diverse selection of cartridges, bullets and bullet weights. I know hunters who don’t have an opportunity to take a shot longer than 80 or 90 yards, yet insist on using a .300 Weatherby Magnum, and I know guys who will take 250-yard shots across open fields with cartridges as small as the .22-250 Remington. I feel the answer to the “best bullet” question might be somewhere in the middle of those two extremes.

A deer isn’t hard to kill, providing you destroy his vital organs. A heavy bullet that doesn’t hit the vitals is useless, and an animal thus struck is going to travel a considerable distance before going down, if it goes down at all. While a lighter bullet that destroys vital tissue can work just fine, then, if the bullet is too light or constructed poorly, it may fail to do sufficient damage. Premature expansion can result in poor penetration, and too little expansion—while giving fantastic penetration—doesn’t do enough damage to the vitals to result in a quick death. Understanding this, then, what you’re after is that balance of expansion and penetration.
Classic softpoint bullets like the Remington Core-Lokt, Winchester Power Point, Speer Hot-Cor and others, when of suitable weight—say, the middle of the range to the heavier end of the spectrum for a particular and appropriate caliber—work just fine at standard velocities. Beef those velocities to that of the magnum cartridges, however, and you’ll begin to see premature expansion and a whole lot of bloodshot meat.
These projectiles are of standard cup-and-core construction, a copper jacket around a lead core. John Nosler had an issue with this construction when hunting bull moose with a .300 H&H Magnum in the late 1940s, and that experience was the impetus for the famous Nosler Partition, which uses two lead cores separated by a partition of copper jacket material. That design gave birth to the premium bullet industry. The Partition remains a staple in the industry, as the front core is soft enough to give good expansion, yet the bullet holds together well enough to penetrate a deer from any angle. I like to use them in bear country, when the odds of seeing a bear or deer are equal.

Another option for controlling expansion is to use a thicker copper jacket. This results in better resistance to bullet breakup. Sierra Bullets have long been popular among handloaders for their accuracy and their construction. Sierra offers many designs, including cup-and-core bullets with thicker jackets, which give great performance on any deer. Federal began to load Sierra’s bullets in its Premium line in the 1970s and continues to do so to this day. One of my all-time favorite deer bullets is Sierra’s 165-grain .30-caliber hollowpoint boattail. It’s seriously accurate, opens quickly to transfer energy and has a thick jacket so that premature breakup isn’t an issue.
There are a good many polymer-tipped bullets on the market today. That design was pioneered by Nosler in its Ballistic Tip bullet, and it makes a sound choice for deer hunting. That tip acts as a wedge to initiate expansion upon impact; Hornady’s SST and ELD X and the Browning’s BXR have a similar design. But, as with a standard cup-and-core bullet, too much velocity upon impact causes these bullets to expand too quickly, resulting in poor penetration. A modern solution for today’s faster cartridges has been to chemically bond the copper jacket to the lead core, resulting in controlled expansion. I like these polymer-tipped bonded bullets in magnum cartridges, where impact velocities can be high, and in lighter cartridges where reaching the vital organs can be a concern. I also prefer them in standard cartridges in those instances where a light-for-caliber is chosen. My 7mm-08 Remington likes the 140-grain Nosler AccuBond load from Federal, and it works wonderfully on deer of any size.

While it doesn’t use a polymer tip, Federal’s Fusion has a bonded core and is another great choice for deer of any species. They are both accurate and affordable, and I have really come to enjoy the entire Fusion line. It doesn’t have a ballistic coefficient value that’s off the charts, thanks to its flat base and a bit of a blunt nose, but at average hunting distances it’s a great choice.

A final consideration are the monometal bullets comprised of copper or a copper alloy. The beauty of their design is that there is no core or jacket to separate, and they usually have a hollowpoint or a polymer tip to ensure the bullet expands upon impact. Barnes Bullets pioneered the design, but these days many companies offer a monometal bullet, including Hornady’s GMX, Federal’s Trophy Copper and Nosler’s E-Tip.

Like I said, there are many choices available for today’s deer hunter, whether he’s hunting these wonderful animals in the thick cover of the Northeast’s hardwood forests or the wide-open expanses of Midwest agriculture. What you ultimately want with the cartridge you choose for your hunting situation is a bullet that provides rapid energy transfer. Be sure your bullet has either enough weight or a construction strong enough to reliably reach the vital organs from any angle, and you’ll be a happy hunter.
About the Author: Phil Massaro is a freelance author and editor-in-chief of Gun Digest Annual. He is happiest hunting the wildest places left on earth.
]]>The advantages of camping by canoe are many, but chief among them is ease of travel. You are not carrying your gear on your back. Instead, it is gliding along in your canoe! This is relatively easy if you are heading down a river, or even paddling across a lake, especially compared to backpacking your load uphill.
Carrying such conveniences as an ice chest, a large tent, a table and chairs or a two-burner stove is easy with a canoe. You are only limited by how much weight your canoe will safely transport. Extravagant lodging, meals, and even oyster roasts are possible on a canoe journey!
Canoeing is also a quiet way to travel, and you are likely to experience an abundance of wildlife such as eagles, otters, ducks, muskrats, deer, and other fauna, depending on your locale. Remote areas become within reach, giving you and your family a level of solitude not afforded by many public areas.
Some canoes are better suited to canoe camping than others. While some are mainly built for day trips on whitewater, others are wide in the middle, flatter on the bottom and capable of carrying great loads. However, many types of canoes and kayaks can be utilized for weekend canoe camping. Check the weight capacity and evaluate your particular craft for safety and stability, especially when loaded with gear.
Safety is key, especially when traveling on the water with family or friends. Always heed laws pertaining to safe boating. Have enough paddles, lifejackets, a noisemaker such as a whistle, or any other gear necessary for the safety of your passengers.
A boater safety course will pay great dividends. Take the lessons you learn there to heart—they could save your life or those of your loved ones. When doing any kind of camping, it is always important to have a plan. Planning greatly reduces the chance of unexpected emergencies. Be sure to identify campsites and if they aren’t public, seek prior approval of landowners on whose property you are camping. The last thing anyone wants is to be chased off, or worse, arrested for trespassing. Let friends and family know exactly where you will be going and when you plan to return.
Learn how your canoe will respond under a load by practicing close to home. When loading your canoe, keep the load low and in the center of your canoe. Gear must be lashed in so that it doesn’t shift. Insure that if the canoe turns over, the gear will stay with the boat. Run lashing ropes through the handles of bags and other containers and tie them off so that they won’t become separated from the canoe in the event of tipping over.
Your campsite should be chosen carefully. Be aware of the possibility of flash floods, and of fluctuating water levels when camping on lakes and rivers. Seek high ground for your campsite and avoid the possibility of your camp being flooded.
When traveling on the water, you’ll need a way to keep gear like sleeping bags, stoves, and extra clothes clean and dry. If packs are to be used, they can be lined with waterproof liners and tied shut. Don’t use garbage bags. If submerged, they will allow water to soak your gear. Instead, use dry bags or other waterproof containers made specifically for use in boats. You may also want to cover your dunnage with a tarp.
Aside from a way to keep everything dry, gear for canoe camping can be the same as other camping gear. As alluded to earlier, because the canoe is doing the work, you can haul heavier loads including things like coolers, kitchen equipment, cots, and other items that would be considered impractical luxuries when backpacking. If your expedition includes more than one canoe, the sky’s the limit!
Canoe camping is the perfect family activity! Fall days on a lake or river could include time spent fishing, hunting, observing wildlife or just paddling and enjoying the scenery. Imagine ending your day enjoying a steak dinner complete with dessert and ice cold drinks! Enjoy your time on the water in style!
]]>An often-overlooked part of recurves is their limbs. Even though they’re durable and can take a beating, limbs must be stored properly to prevent problems. Never leave them inside a hot vehicle for long. Prolonged heat affects epoxies that hold limb layers together, which can cause twisting and even delamination.
In addition, never store a recurve by standing it on one limb. The riser’s weight and add-on accessories can deform the limb, especially if it’s stored like that for a long time. And even though modern recurve limbs can handle it, don’t leave your bow strung for long periods. Manufacturers such as Hoyt note that Korean archers unstring their bows when leaving a range for lunch.
Bowstrings can wear out quickly if you practice often and take lots of shots. Strings last longer if you apply a good wax every other week, which keeps out moisture while preventing string fibers from splitting. If you see strands fraying and breaking, buy a new string.
Speaking of moisture, shooting in the rain is fine and sometimes unavoidable. Just clean and dry your equipment when returning home or to your hotel. Disassemble your bow and its sight, plunger and stabilizers, and dry every piece with a towel, paper towel, or hair dryer. Moisture causes oxidation and possibly rust on some parts. Disassembling, drying, cleaning and reassembling your equipment reduces problems and on-the-go troubleshooting.
Bow maintenance is just one task you should learn. Likewise, arrow maintenance requires daily attention. If you miss the target, inspect that arrow before shooting it again, especially if it’s made of carbon, which weakens when hitting hard objects.
If it’s made of aluminum, check to ensure it didn’t bend. To check an arrow’s straightness, spin it with its point on your palm and the nock pointed up. If it spins without wobbling, it’s straight. Also check the shaft for dents or cracks, which can compromise the shaft’s integrity. You can check a carbon arrow for cracks by bending it with both hands and spinning it while bent. If you hear a crackling noise, the arrow is damaged and should be retired.
Shooting tight groups can also damage arrows. After shooting a tight group, check each arrow shaft for dents or cracks; and look for cracked nocks and damaged fletching. Dents and cracks weaken shaft integrity and make those arrows unsafe to shoot. Cracked nocks can explode if shot, which can cause a destructive dry-fire or injure the archer. Damaged fletching is less critical, but look for a tear in the fletch’s leading edge. Such tears cause arrows to fly erratically.
Conduct those three inspections every time you pull arrows from targets, especially when shooting with others.
Knowing your equipment is just one step to becoming a more skilled, knowledgeable archer. Most archers on the World Cup and World Championship circuits know their equipment thoroughly. That knowledge is a vital building block in their confidence as world-class archers.
The post Take Care of Recurve Equipment appeared first on Archery 360.
]]>Before you even start packing your backpack, the very first thing you’ll want to do is organize the gear that you’ll be taking with you on the trip.
Start by laying it all out on the floor to get a sense of everything you plan to bring along. This gives you the opportunity to take a quick inventory of your equipment and identify the things that might be missing from the collection, not to mention the items that aren’t necessary for that particular outing. It is also a good way to assess whether or not your backpack has the capacity to haul everything you want to take with you.
Once you’ve collected all of the gear that you’ll be using on your trip, the next step is to start putting all of it inside your pack.
Naturally that means starting at the bottom, where you’ll place the items that you’ll least likely need to access throughout the day or when you first arrive at camp that night. Those items generally include the following:
- Sleeping bag
- Extra camp shoes
- Any layers of clothing that you aren’t likely to need on the trail that day.
To get started:
A. First place your sleeping bag at the very bottom of the pack. This helps give the bag some shape and provides a soft cushion where the pack rests against your lower back.
B. If you’re bringing an extra pair of shoes, place them on top of the sleeping bag.
C. Then stuff your additional layers of clothing on or around the shoes to help hold everything securely in place.
Quick tip: Getting a hydration reservoir into a backpack that is fully loaded with gear is extremely challenging. If you’re using a reservoir to stay hydrated while on the trail, be sure to fill it with water and put it into your backpack first.
The middle section of your backpack is where you want to store heavier items that you won’t necessarily need while hiking.
This creates a good center of gravity, helping you to maintain your sense of balance on the trail, even while scrambling over rocks or up and down rough terrain. If bulky items are too close to the bottom they can cause the backpack to hang lower than it should, potentially causing discomfort. If those items are placed near the top, they can alter the center of gravity, creating instability. They would also just be in the way when trying to access items that need to be more readily available.
The gear that you’ll want to stash in the core section of your pack includes your:
- Tent
- Camp stove
- Cooking pots
- Any food that you won’t need throughout the day.
- It is also a good place to store extra clothing, fuel canisters, and a bear canister (for storing food) if one is required where you’ll be camping.
Finally, you’ll top off your backpack with the items that you’re most likely need to access during the day, as well as the things you’ll want close at hand should an emergency arise.
For example, if it starts to rain, you’ll want to be able to grab your rain gear as quickly as possible, so having a waterproof jacket in an easily accessible place is a good idea. The top of the pack is also a good place to stash your lunch, too, as you’re likely to stop somewhere along the way for a quick meal.
Other items that should be packed close to the top include:
- An insulated jacket
- First aid kit
- Any toilet supplies
The top of your pack is also the perfect location for your headlamp, extra snacks, and a water filter, as those are important items you may need to grab while en route from one campsite to the next.
Quick tip: Some backpackers prefer to pack their extra pieces of clothing last, using the layers to fill in extra space around their other gear. This can be a good way to ensure that everything is held firmly in place, while still making the most of the space that is available.
With the inside of your pack quickly filling up, you’ll find extra storage space outside of the bag to be a handy place to store smaller items. For instance, most packs have gear straps at the bottom that are perfect for attaching a sleeping pad. Lashing points are good for holding trekking poles and ice axes, or attaching a GPS device or compass via a lanyard for easy access.
External pockets are designed for holding tent poles, a water bottle, or a pair of shoes. A lightweight solar panel can even be connected to the pack for charging small electronics while you’re on the go.
Most backpacks have hip belts equipped with small zippered pockets, too. These are handy for keeping energy bars, a camera, or a smartphone within easy reach.
Once you’ve securely loaded all of the gear in your pack and made sure your footwear is in order, you’ll be ready to hit the trail. By following these guidelines, the weight load should be well distributed, and all of your equipment should be organized, too. This will make hiking with a full pack much more enjoyable and keep things simple when arriving at your campsite at the end of the day.
]]>So, come along on a virtual hike and enjoy fall foraging. Our adventure takes place in the Northwest, but you can apply all of the foraging rules you learn here to wherever you live. I promise that when you give foraging a try, the thrill of the hunt will entertain you, whether you end up with a hearty supply of berries, mushrooms, nuts, and fruit…or don’t have much luck.
Note: Many wild edibles have toxic and even deadly look-alikes and you could eat the wrong thing. It takes a good amount of research and actual field work to know your mycology and herbology before you can just start picking wild edibles and eating them. Always do your research before setting out.
Elderberries: Elderberry harvest season is fairly short, from mid-August to mid-September, depending upon your region (this is certainly the season near my home in Southern Oregon). These tiny berries grow in clusters that are a bear to pick, but they are well worth the effort!
Best used for: make an elderberry jam to spread on toast all winter long.
Blackberries: Depending on where you live in the Northwest, some blackberry harvests will be at the very end of August, but at higher elevations, the season can extend into fall. Look for thorny blackberry bushes near streams, or climbing up the sides of remote fences (be sure to ask permission before foraging on private property). Bring sturdy hiking boots and protective clothing, as scratches are a guarantee if your skin is exposed while picking.
Best used for: freezing to use in smoothies and in muffins.

Quick Tip: September is the start of hunting seasons in most states. Check your local Game Department for exact season dates and make sure everyone in your foraging party wears a hunter orange hat and vest to unsure their safety.
Wild apples: Sometimes called crabapples, wild apples grow in abundance in Washington State, but you can find them in many other states as well. You never quite know what you’re going to get with wild apples, which can range from sweet to barely editable. The key is to get to them before the wild birds do.
Best used for: pie baking and apple cobbler making.
GREAT FORAGING RESOURCES:
The following are my favorite resources for foraging outside of my home region.
If you live in the Northeast read: Northeast Foraging: 120 Wild and Flavorful Edibles from Beach Plums to Wineberries
If you live in the Midwest read: Midwest Foraging: 115 Wild and Flavorful Edibles from Burdock to Wild Peach
For Backyard Foraging read: Backyard Foraging: 65 Familiar Plants You Didn’t Know You Could Eat
If you live in the South read: Stalking the South’s Wild Edibles
Juniper Berries: aren’t actually berries at all, but rather a type of pine cone found east of the Cascade range, for the most part. I’ve found them in Central Oregon, and I know that some Oregon distilleries use local juniper berries in their wares.
Best used for: tea and…you guessed it…gin! Make your own infused winter gin! Find juniper berries east of the Cascades range. I’ve found them in central Oregon.
Quick Tip: Not sure where to start? Check out an urban foraging park, such as Seattle’s Beacon Food Forest, located inside Jefferson Park. Here, you’ll be educated on what you can forage and eat…then take the knowledge into the wild.
Mountain Huckleberries: Found in the northern part of the Pacific Northwest, huckleberries are in abundance in mid-summer. In early fall, you’ll still see their close cousin, the Mountain Huckleberry, at higher elevation in Northern Idaho, Washington State, and British Columbia (among other locales). Look for them along hiking trails near the treeline.
Best used for: huckleberries make a great addition to a vanilla ice cream shake, or on top of pancakes. Fold huckleberries into just about any baked goods, actually.

Quick Tip: Go farther north to Alaska, and you can add salmonberries to the list, along with blueberries and thimbleberries.
Dulse – This red-hued seaweed is common throughout the Pacific Northwest shorelines and is among the tastiest. If you live near a coast, harvest Dulse by removing only parts of the clump, for conservation’s sake, and always wash three times or more in cold water before using. You can also harvest kelp (particularly forest kelp), throughout coastal Pacific Northwest.
Best used for: add to soups or atop salads.
Oyster mushrooms: In western Washington, oyster mushrooms are often found growing on dead or dying alders. On the east side of the Cascade Range, you will more often see oyster mushrooms on dead or dying cottonwood trees. The key to finding them: look on downed logs.
Best used for: sautée in garlic and butter, or make a risotto.

Golden chanterelle mushrooms: Chanterelles grow in conifer and oak forests (think lower elevations). You’ll need to look in an area with mossy growth under your boots. They’ll be growing through October, so they’re great to forage after the spring morel season is over. Look for mushrooms with a funnel shape, that have a solid stem. They’ll grow in groups and near trees. Note: Jack-o-Lantern mushrooms are toxic, and grow where there might not be trees.
Best used for: soups and stews.
The California King Bolete mushroom: this mushroom grows in the woods in California and Oregon. You won’t find them near trees, and they are distinct by their sponge-like tubed surface on the underside of their cap. These bad boys can get very large, and can be foraged in September, October and November.
Best used for: any recipe that calls for a ‘meaty’ mushroom; grill them like steaks!
Quick Tip: Get into foraging this fall, then return to it in the spring, after the snow melts. In the Pacific Northwest, spring is the season for many wild greens, morel mushrooms, and for clamming on the coastline.
Live outside the Northwest? I’ve picked early fall blueberries galore in Maine, and have heard tell of wild ramps in West Virginia, wild ginger in Tennessee, and maple for syrup-making in all parts of New England. No matter where you live, a great resource for foraging in any state is the Cooperative Extension. Local garden shops and master gardener programs are also great starting points. Let us know what kinds of things you forage for by adding your tips to the comments section below.
Remember, never, ever forage and eat anything without being 100-percent certain of its identity as a safe plant to consume.
Add your foraging resource suggestions to the comments section below.
Related articles that may interest you:
5 Amazing Weekend Fall Hikes Across The U.S.
If you shoot a low draw weight or short draw length, you might struggle at longer distances, especially at 70 meters. A common problem is arrows falling short even after you adjust your sight to its lowest setting. If you encounter that problem, we have some tricks to help you hit the mark.
Outdoor Arrows
Have you switched to outdoor arrows? Indoor arrows are typically heavier, with a fatter diameter and larger fletching than outdoor arrows. Those features make indoor arrows the king at 18 meters, but for farther distances you’ll want lighter arrows with smaller vanes. If you need help selecting outdoor arrows, consult an archery shop’s technicians. These experts will help you choose your arrows and components, and then tune your bow for the setup.
Increase Draw Weight
Higher draw weights boost arrow speeds and flatten trajectories. If you decide to raise yours, increase it incrementally as you build strength to avoid injury. One of the best exercises for increasing draw weight is “specific physical training,” or SPT, which was developed by KiSik Lee, USA Archery’s head coach. SPT exercises usually require a bow, but resistance bands or other training devices that mimic drawing a bow also work.
The exercise is simple. Draw your bow and hold it at full draw with good form for at least 15 seconds but no more than 30 seconds. Then rest and repeat the process for 30 minutes to an hour. An hour of this exercise equates to shooting 200 to 250 arrows.
To ensure safe SPT with a bow, stand in front of a target with an arrow loaded. If you accidentally fire, you won’t damage your bow. Resistance bands let you do SPT workouts at home while watching TV or enjoying some fresh air and sunshine.
Don’t forget that increasing draw weight affects your arrow tuning. You might need to adjust your equipment when reaching your goal weight.
Move Your Sight Bracket Down
Simple solutions are sometimes all you need. If you can’t lower your scope or sight pin, try lowering the entire sight bracket. The brackets on most target sights can be removed, lowered and reinstalled so archers can lower their sight pin.
Lowering the pin lets you shoot targets farther away, but it can cause clearance problems if you move it into the arrow’s path. To test for clearance, put your arrow on the rest with its fletching forward. Hold the arrow level, as if you could shoot it, to see if the fletching touches the sights or scope.
Bring Your Sight In
Most target sights have an adjustable extension piece to move the sight in and out. Move your sight in to make your arrows hit higher. If you bring the sight all the way in, and you still can’t reach your desired distance, try flipping the bracket around, which brings the sight even closer. Watch the video above to see this method demonstrated.
With these tips and a little help from an archery pro, you’ll enjoy shooting farther distances.
The post 4 Tips for Hitting Outdoor Distances appeared first on Archery 360.
]]>In cooler weather, keeping your feet warm and protected is crucial. Fall hiking doesn’t require all the insulation and warmth that winter boots offer, but you need a little more than your Chaco sandals out on the trail. A good, comfortable hiking boot or shoe, like the Targhee from Keen, will do the trick quite nicely. If you live in an area that tends to get a lot of precipitation in the fall, consider getting a waterproof version of the boot you choose.
In many places, late fall temperatures can vary radically, sometimes within a few hours. So, when you head out on the trail, a jacket is a necessity. However, you’ll want an outer layer that breathes well and will keep you comfortable across a wide range of temperatures. A hood is also a nice thing to have in the event of unplanned precipitation. Patagonia’s Nanopuff Hoody is a good example of a jacket that checks all these boxes.
Do you really have to have specialized hiking pants in order to head out on the trail in the fall? No, probably not, but pants designed with the hiker in mind can help keep you comfortable and warm when you’re out there. Hiking pants tend to be tear-resistant and have a little bit of stretch to help you get over rough patches. Well-placed pockets and fast-drying materials, like you’d find in the Kühl Renegade are also features to look for in hiking pants.
Another key clothing item for fall hiking is a pair of warm, comfortable hiking socks. You’ll want a sock that covers your ankles and offers plenty of support and cushioning for your feet, like the Darn Tough Full-Cushion Boot Sock. Also, look for socks that wick away or absorb moisture from your feet, or consider a pair of liners to wear inside your socks.
In colder weather, gloves are an excellent thing to have along on a hike. Not only do they keep your hands warm, the right pair will keep them dry and protect your hands if you’re using trekking poles or are on a trail that requires a lot of hand holds. The Trailsmith Gloves from REI are an example of extra-tough hiking gloves. Look around and find the right gloves for you.
A neck gaiter is a really awesome thing to have along on a cold weather hike. You can use it to keep your neck, ears and face warm if the wind picks up, and you can pull it down if the weather improves. They also make good impromptu face coverings when quickly passing other hikers on the trail. Columbia’s Trail Shaker is a solid gaiter for fall hiking.
A warm head makes for a happy hiker, and a warm hat will do the trick. When you’re out in biting weather, it’s nice to have built-in ear protection in a hat. Outdoor Research’s Peruvian Gore-Tex Infinium Hat is a good example of a hat that offers ear protection when you want it.
]]>New England is world-renowned for its fall colors and visitor attractions, and Ride The Wilds has everything you need to see them from the seat of an ATV. Dedicated in 2013, this system has over 1,000 miles of interconnected trails in northern New Hampshire. Along the entire route, Ride The Wilds is connected to small towns that welcome ATV riders to enjoy their hospitality, fall festivals, and rider services, including food, fuel and lodging.
Ride The Wilds is popular with both novice and experienced riders. The terrain varies from easy-riding gravel roads and trails that wind their way through scenic woods and pastures, to routes for more experienced riders up into the mountains of New Hampshire, with many scenic stops for panoramic views of fall colors.
The Ride the Wilds website has many resources to help you plan your trip, including information on registering your vehicle or renting one, plus dining, shopping, attractions and lodging.
Quick Tip: Trail conditions change with the weather on this fall adventure. Carry both a dust mask and rain gear to keep the fun rolling no matter what Mother Nature sends your way.
TrailsHeaven is the name of the website for Hatfield-McCoy Trails. And for good reason. This expansive, professionally managed trail system offers over 600 miles of trails for off-road enthusiasts of all skill levels. Riders trailer their vehicles here from across the country, knowing they will experience a wide variety of fun, scenic and sometimes challenging routes, with heavenly views of the mountains of southern West Virginia.
Hatfield-McCoy is actually seven different trail systems, all connected to ATV-friendly towns where riders can find great places to eat and shop, with generous doses of Southern hospitality. Trails range from the scenic mountain views of the Pinnacle Creek Trail, to the tight and twisting trails of the Bearwallow Trail. Bed & Breakfasts, cabins and campgrounds are plentiful, all welcoming ATV owners year-round.
The Hatfield-McCoy website takes you step-by-step through trip planning, including how to get a trail permit, choose the right trail for your experience level, find lodging to match your group size and budget…and more.
Quick Tip: There’s a good chance you’ll encounter puddles and mud on any ATV outing. Store your smartphone, tablet and chargers in a waterproof case or plastic sandwich bag while riding.
Paul Bunyan is a giant of American folklore. Just south of Bemidji, Minnesota, site of the famous statue of Paul and Babe the Blue Ox, stands the giant of all ATV trail systems in the Midwest. The Round River Drive Trail : attracts ATV and dirt bike riders from across the state as well as neighboring states and Canadian provinces.
Here, they can ride up to 100 miles of signed and maintained trails, choosing easy-riding forest roads winding their way through pine forests, or narrow, twisting, rock-filled ATV trails designated as moderate to difficult. An additional 100 miles of single-track trails are open to off-highway motorcycles only.
The public trailhead features a large parking area that accommodates RVs and trailers, with a few spots for free camping, no reservations required. The Stompin' Grounds Campground and Lodge, located right off the trail on the southern end of Round River Drive, caters to day-trippers and week-enders, with free parking and a wash station, plus a bar and grill, and many reservable campsites.
Quick Tip: This trail has a lot of rocks and boulders. Wear over-the-ankle boots for good balance and foot protection.
Riding the trails of Moab is unlike anything else in the country. This area of Utah has hundreds of miles of unique trails on “slickrock,” with breathtaking views of rock formations sculpted by the wind. Choose any of 30 trails, from easy-riding routes geared toward families new to the sport to difficult trails that challenge the technical skills of the most experienced riders.
There are many steep climbs and descents, with dramatic views of La Sal Mountains, Abyss Canyon, and the Colorado River. Want to ride but don’t own an ATV? There are adventure tour companies where you can rent a side-by-side ATV or 4-wheel drive truck and head out on your own or sign on to a guided trail ride of non-stop outdoor adventure.
Quick Tip: When you see a trail of dark, rubber residue on the rocks, consider taking that line, especially if you are a novice rider. It may not be the only route, but it could be the safest.
It’s official name is Imperial Sand Dunes Recreation Area. But everyone calls this open riding area of golden sand by the name of the local community: Glamis.
Located in the southeast corner of California and managed by the Bureau of Land Management (BLM), Glamis is the largest mass of sand dunes in the state. While you won’t find fall foliage here, in late fall, Glamis is a sight to see, for the variety of ATVs, side-by-sides and sand rails riding and racing each other, and the beauty of the dunes that reach heights of 300 feet above the desert floor. A note of trivia: these sand dunes were featured in the movies Star Wars and The Scorpion King.
The Glamis dunes stretch for 40 miles, with most of the riding activity in the area south of Highway 78. You’ll need to know the rules and regulations before riding there. Two “must-haves” are a riding permit and a tall safety flag, so other riders can see you coming over the top of a dune. Fall is a great time to get out to Glamis and enjoy a roller coaster ride on the sand.
Quick Tip: Dunes are constantly changing. Use stationary landmarks or a GPS to help you navigate. And always ride with caution, watching for ravines, depressions and steep drop-offs formed by blowing sand.
Related Articles that may interest you:
ATVs—Here’s How To Find The Best Riding Trails
But here’s the deal: ATVs are motorized, and with that comes important safety rules you need to follow.
According to the Consumer Protection Safety Commission, in 2015, there were 97,200 injuries related to riding ATVs—28 percent involved kids under 16 years-old. Here are some smart tips from seasoned riders, to ensure that you and your family members have the best ATV experience possible.
For one thing, kids should not be placed upon some big honking device—there are ATVs specifically sized for younger riders, so look into them. Engine CCs of up to 70 are good for kids aged 11 and under. 250 CCs and up work for intermediate/advanced riders. Rule of thumb: When it comes to engine size, it’s better to go too small versus too big (and always keep an eye on kids under 16 years of age).
Sure, ATVs look easy to drive, but because they’re motorized vehicles, any and everyone who plans to board one should take a basic course in how to drive them. It’s just good sense, so do not skip this important step!
Whether you rent or buy your ATV, review the owner’s manual to get the skinny on how it works.
Meaning, check fluid levels (gas, oil, coolant), chains, air filter, and tire pressure before you get started. There are many riders who just want to hop on and take off—only to be stranded later by something as simple as an empty gas tank.
Whether you’re renting or have just bought a new ATV, the default position will be different from yours. Take a moment to adjust handlebars, clutch, and any levers to make them “yours.”
Even in warmer months, there are some non-negotiables when it comes to ATV gear. Most importantly, a helmet. ATVs are meant to go over some dodgy terrain, and the possibility of being knocked off—and out—is a real thing. For that reason alone, a helmet is essential. Other important pieces of gear include gloves, boots that go over your ankle, long pants and long-sleeved shirt, a chest protector, and goggles. Face it, the trail kicks up lots of unexpected “surprises,” like a pothole or big branch, so take no chances. It’s not worth it.
Sure, the ATV goes “vroom vroom”—and it may be tempting to race the motor, and pop a wheelie. But that’s a fast way to hurting yourself. It’s a fact that more folks are injured riding ATVs than in any other outdoor sport, so be responsible.
Remember those potholes and errant branches? Even wearing safety gear, you could still wind up in serious trouble. Always take someone with you when riding. But never put someone on the back of a single-rider ATV.
Seriously. Just don’t!
There’s a reason “terrain” is part of the name: off-road is where they’re meant to be used. On that same note, don’t cross over onto private property, and be respectful of environmentally-sensitive areas like dunes.
*Note: Age restrictions, special licenses, and other requirements for off highway vehicles vary from state to state. Before heading out on your OHV, please consult your local regulations.
]]>Shooting arrows and getting in the “reps” is advantageous to archers, especially in developing form and technique. Repeating the same actions over and again trains the muscles and mind to execute the shot subconsciously. That is the goal of every high-level archer; giving yourself too many instructions while competing isn’t normally a good thing. Olympic archers will shoot as many as 2,000 to 3,000 arrows in a week as part of their training so when the pressure is on, they have absolute trust in themselves and their process to execute the shots they need to hit the 10-ring.
Does that mean you need to be shooting 3,000 arrows per week? Probably not.
Periodization Training
Serious and competitive archers will always want to practice shooting, and they will want to have training sessions of 200 to 400 arrows, depending on where they are in their competition season. They won’t always shoot the maximum number of arrows that they can handle, but they will follow specific routines of how many arrows to shoot each day in the lead-up to their next big competition. This is called periodization training. Periodization refers to the raising and lowering of an archer’s arrow volume in order to achieve on-demand peak performance at a specific time or event. Without this, elite archers would suffer burnout and would not be able to endure an entire outdoor competition season that can last for several months.
Too much archery practice can lead to a myriad of problems, and the most common problem is repetitive use injuries. The repetitive motion of shooting a bow, combined with the one-sidedness of only pulling with your dominant side, can give you muscle or tendon strain that can take a while to heal. Knowing your limits with practice can help you avoid injury. Eager archers often want to increase their arrow volume in practice sessions too aggressively and too quickly, say, by jumping from 150 arrows one day to 300 the next. While some people can handle doing this, the majority of archers cannot. It is smarter to increase arrow volume a little at a time so your body doesn’t get a shock when too many arrows are shot in a single session. If you want to start bumping up your volume, a methodical procedure is the better way to go. For example, start with an arrow volume of 150 and stay there for several practice sessions. Then increase by 10% to 165 arrows per session for several sessions, and repeat. By following a similar process, you reduce the chances of injury in your shooting muscles while steadily increasing the volume of practice.
Giving yourself days off is also highly recommended to avoid practicing too much and giving yourself an injury. Most high-level Olympic archers take scheduled days off during their week to allow their bodies time to recover. As an example, the Dutch team takes the weekends off or does a very light volume of 100 arrows on either Saturday or Sunday (yes, 100 arrows is a small amount for those archers). The Turkish team trains for two weeks and then takes a day or two off, depending on where they are in the season. You will be able to find your limit of how much shooting is too much and devise a schedule to suit your needs.
Make sure that you don’t just shoot, but try to be active in other ways. If you want to stay in archery for a long time, you should take the time to keep yourself healthy and active. A balanced body will lead to fewer problems that can arise from the one-sided aspect of archery. Learn your own practice thresholds and you’ll be training — not overtraining — like the pros.
The post Can You Practice Too Much? appeared first on Archery 360.
]]>